You can ride a bike without knowing you’re sitting on a saddle and not a seat, but if your tire gets a snakebite flat or your spoke needs an adjustment, will you know which parts need attention and how to talk shop decently enough to get what you need to get back on the road?
Table of Contents
After reading this glossary of bike parts, the answer is yes, yes you will. Worst case, you’ll know enough not to embarrass yourself.
Essential Bicycle Parts (Most Bikes)
Pedal
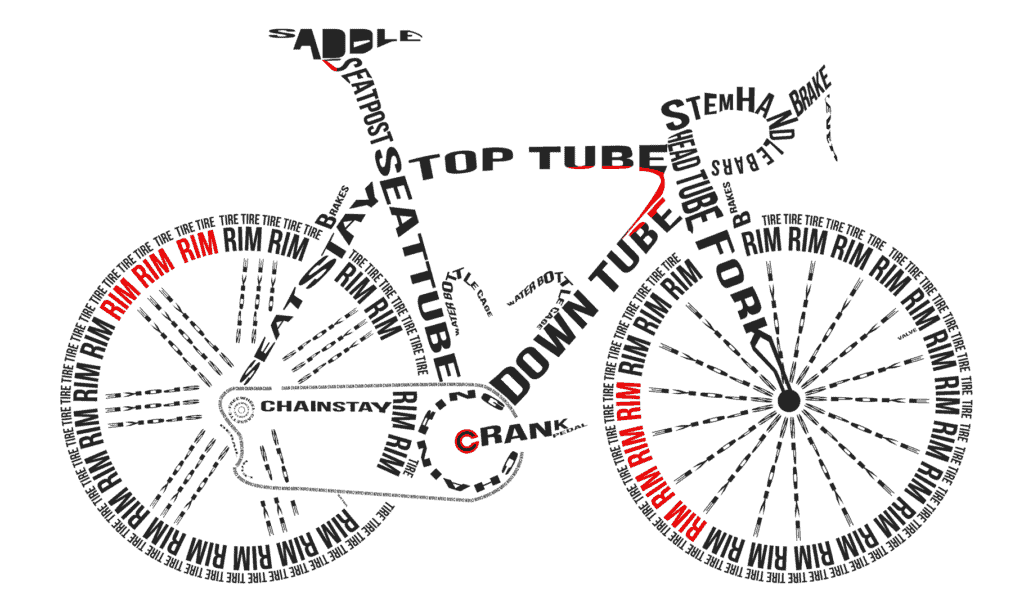
Let us start at the bottom with something obvious. The pedal is the piece you already know: it is here that a cyclist places their feet. The pedal is attached to the crank arm. The crank arm is rotated by the cyclist as they pedal, thus spinning the chain around the chain ring, and from whence the power of movement begins.
Chain ring
A chain ring is the round, spiky wheel connected to your cranks. It is wrapped by a chain, which it pulls around Chain rings are literally the necessary cog in the machine that is your bike. They’re the part responsible for transmitting the energy you create by turning the rear wheel via the chain.
Front derailleur
The front derailleur is the mechanism that changes the front gears by lifting the chain from one chain wheel to another (if your bike has more than one chain ring; it allows the cyclist to adapt to road conditions. How a front derailleur works.
Chain (or drivechain)
The chain consists of a set of metal links meshing with the sprockets on the chain wheel and gear wheel to transmit the pedaling motion to the rear wheel. Simple.
The drivechain on a bike consists of all the mechanics that push (or pull) the bike along: pedals, cranks, chain rings, chain, cogs (cassette) and derailleur.
The crankset (in the US) or chainset (in the UK), is the component of a bicycle drivetrain that converts the reciprocating motion of the rider’s legs into rotational motion used to drive the chain or belt, which in turn drives the rear wheel. [source]
Chain stay
The chain stay is the tube that connects the pedal and crank to the rear-wheel hub.
Rear derailleur
The rear derailleur is the rear gear-changing mechanism on bikes with multiple speeds. It acts by lifting the chain from one gear wheel to another, and allows the cyclist to adapt to changing verticals and road conditions.
Rear brake
The rear brake is usually situated near or on the right handlebar. The rear brake is the mechanism activated by a brake cable, comprising a caliper and return springs; it forces a pair of brake pads against the wheel sidewalls to stop the bicycle via friction.
Seat tube
The seat tube is the part of the bicycle frame that leans slightly to the rear. Inserted within it is the seat post, and below at the opposite end, the seat tube joins the pedal mechanism.
Seat stay
The seat stay is the diagonal tube connecting the top of the seat tube with the rear-wheel hub.
Seat post
Component supporting and attaching the seat, inserted to variable depth into the seat tube to adjust the seat’s height.
Saddle
It seems counter-intuitive since the seat post supports this piece, but the saying goes “sit on a seat, straddle a saddle,” so the saddle is the small triangular spot attached to the bicycle’s frame upon which a cyclist sits their seat. Clear as mud.
Crossbar
The crossbar, aka the top tube, is the horizontal part of the frame connecting the head tube with the seat tube, stabilizing the frame.
Down tube
The down tube is the part of the bicycle frame connecting the head tube to the bottom bracket where the crank attaches to the frame. The down tube is the longest and thickest tube in the frame and gives it its rigidity.
Bottom bracket
The bottom bracket on a bicycle connects the crankset (aka chainset) to the bicycle and allows the crankset to rotate freely. It contains a spindle to which the crankset attaches, and the bearings that allow the spindle and cranks to rotate. The chain rings and pedals attach to the crank arms (sometimes just called cranks).
Tire valve
The tire valve: each wheel has a small pneumatic tire valve sealing the inflation opening of the inner tube; it allows air to enter but prevents it from escaping. Usually a shrader valve on a mountain bike, and presta valve on a road bike.
Spoke
A spoke is a thin metal spindle connecting the hub to the rim. Each bicycle wheel has many spokes arranged across its length, giving the wheel its strength and shape.
Tire or tyre
The tire is the part of the bike that touches the road. The tire is usually made of cotton and steel fibers coated with rubber, mounted on the rim to form the casing for the inner tube, the part inflated with air (unless the tire is tubeless).
Rim
The rim is the metal circle constituting the wheel’s circumference and on which the tire is mounted. The brake pads grip the rim’s sidewalls when brake levers are engaged.
Hub
The front hub is the middle of the wheel from which the spokes radiate outward to the rim. Ball bearings within the hub enable it to rotate around its axle. The fork attaches at the front hub, and the rear stay attaches to the rear hub.
Fork
The fork is the two tubes connected to the head tube and attached to each end of the front-wheel hub. The fork’s offset influence’s the bike’s handling characteristics.
Front brake
The front brake mechanism is engaged by pulling a brake cable, which forces a pair of brake pads to grip the rim sidewalls to slow down the front wheel.
Brake lever
The brake lever is attached to the handlebars. The cyclist activates (squeezes) the brake caliper at the handlebars and the brakes activate at the rim sidewall via a brake cable.
Head tube
The head tube attaches the stem to the fork and down tubes and uses ball bearings to transmit the steering movement to the fork.
Stem
The stem of a bike is adjustable, a cyclist can raise or lower the stem height depending on the reach of the rider and desired riding positioning. The stem is inserted into the head tube and supports the handlebars.
Handlebars
The handlebars attach to the bike stem, and are the way by which a cyclist steers and brakes the bicycle.
Brake cable
The brake cable is an entwined, covered steel cable running along the length of the top tube or down tube depending on the bike style, and transmits the pressure exerted on the brake lever to the brake when the cyclist squeezes the brake lever.
Shifter
The shifter is the lever for changing gears via tension on a cable that moves the derailleur and ultimately, the chain.
Here is a handy, more detailed diagram illustrating the parts of a road bike or mountain bike from RideOn Down Under.
Optional Bicycle Parts
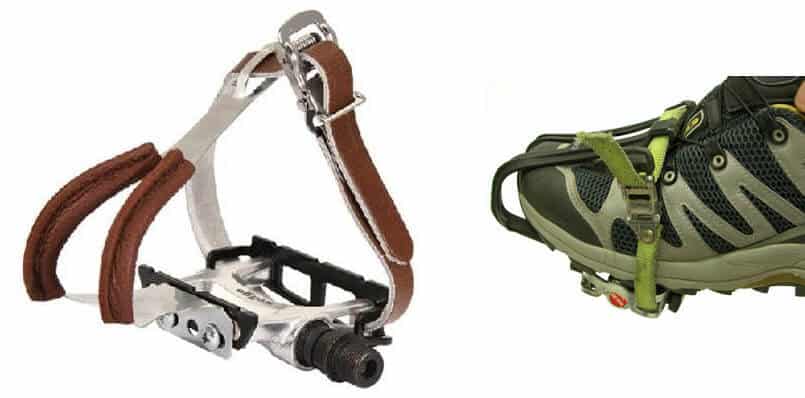
Toe clip: This is a metal/plastic/leather device attached to the pedals that covers the front of the feet, keeping the feet in the proper position and increasing peddling power.
Reflector: Device returning light toward its source so that other users of the road might see the cyclist.
Fender: Piece of curved metal covering part of the wheel to protect the cyclist from being splashed by water.
Panniers: A bicycle pannier is a basket, bag, box, or similar container, carried in pairs, attached to the sides of a bicycle or motorcycle.
Rear light: A red light, solid or flashing, that makes the cyclist visible in the dark from behind.
Front Rack: Rack on the front of the bike. Lowrider racks are touring bikes as they keep your pannier weight as low as possible to the ground; this allows heavily-laden touring bikes to feel as stable as possible at low to medium speeds. Porteur racks are designed to stabilise large front loads above the wheel. Randonneur front racks are used to support the weight of small randonneur bags.
Carrier (aka Rear Rack): Device attached to the back of the bicycle for carrying bags (panniers) on either side, and securing packages on top.
Tire pump: Device that compresses air and is used to inflate a bicycle tire’s inner tube. Usually has both a presta and schrader valve.
Water bottle clip: Metal or Plastic support attached to the down tube or the seat tube for carrying the water bottle.
Headlight: Lamp attached at the front of the bike, illuminating the ground a few yards in front of the bicycle. Usually white light, flashing or solid.


